I’ve been working on a module with some advanced tools for importing data into Gibbon. Our school was previously using Blackbaud’s Education Edge/Faculty Access and just started using Gibbon this year, so it was important to migrate thousands of various records into the new system and help ensure that the data is formatted and validated before it goes into the database.
If anyone is interested in using or testing this module you can find the repository on GitHub:
https://github.com/SKuipers/module-dataAdmin/tree/master/Data%20Admin
Download here: https://github.com/SKuipers/module-dataAdmin/archive/master.zip
Install in the modules folder & activate in System Admin to use. Works with v12 and v13(dev).
Features: (v1.0)
• A multi-part import form for improved control over incoming data
• Performs a dry-run before importing to see the anticipated results
• Handles relational fields (eg: transforms usernames into gibbonPersonID on import)
• Filters and validates many types of data (dates, emails, urls, roles, etc)
• Assign columns to database values ad-hoc and can skip non-required columns
• Choose to Update & Insert, Update Only or Insert Only when importing
• Create a database snapshot before importing to rollback changes if needed
• Keeps import logs tracking the user who made them and the results of the import
• Remembers the column order from the last import to speed up future imports
• Choose to export an excel file with all importable columns pre-filled
• Imports defined with a flexible YML syntax
How to use:
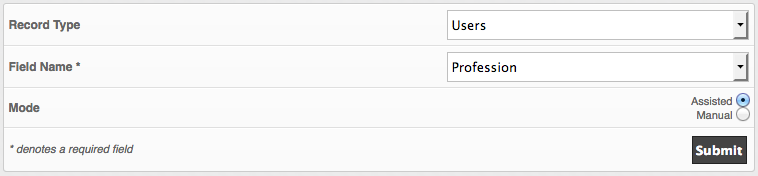
Once Installed, go to Admin > Data Admin. This shows a list of all the types of imports currently setup (new ones will continue to be added, feel free to request something if it’s not in the list). The difference between these and regular Gibbon imports is they must have a header line in the csv file. The headers come into play once you go to step 2 where you can assign columns to fields, and optionally skip columns. Step 3 is a dry-run so you can see the results and any data formatting errors before the database is changed. If everything looks good, step 4 will complete the import into your database.
Snapshots are useful as an extra layer of database backup. Before you perform an import you can take a snapshot and if things go horribly wrong you can restore the snapshot. These aren’t meant for live systems where people might be making changes continuously, or as a standalone backup method (they store locally in the upload folder, where as a good backup method should be on a different drive).
To help with formatting spreadsheets into csv files you can open an import type and click Export Structure. This will give you a spreadsheet with pre-filled column names. You can also click Export Data to make changes to a set of data in spreadsheet form then re-import it. To do this use “Update Only” and “Same as below (skip first column)” in Step 1, and the “Use database ID field” option in Step 2. Both Export options create an .xls file which would need saved as .csv to re-import.
I recommend using it on a local or development system first. I have tested and used it quite a bit myself however there are no guarantees. This program is distributed in the hope that it will be useful, but without any warranty; without even the implied warranty of merchantability or fitness for a particular purpose. See the GNU General Public License for more details.
Feel free to post any questions or send feedback, either in this thread or email me: sandra.kuipers [at] tis.edu.mo
Thanks!